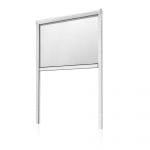
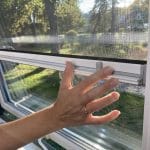
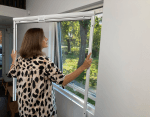
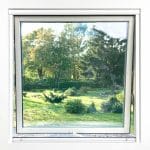
Roller insect net for all types of windows

 1.00

✔ Tailor-made for perfect fit
✔ Lifespan 10+ years
✔ Various installation options
✔ Weather resistant
✔ Install in 10 minutes

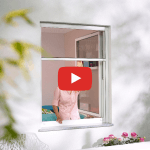
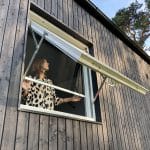
Our durable roller insect screen is suitable for almost all types of windows, opening both inward and outward. It is easy to install, use and does not need to be removed at the end of the insect season.

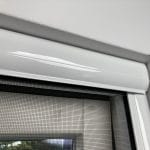
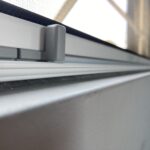
The product package includes:
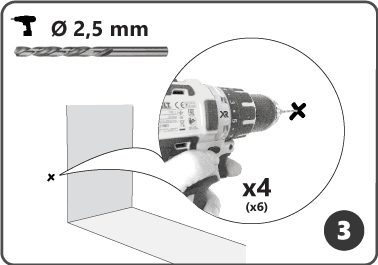
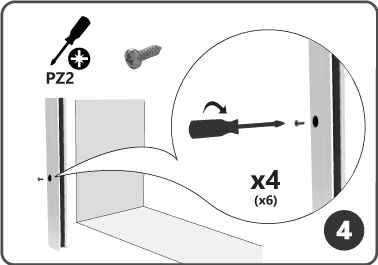
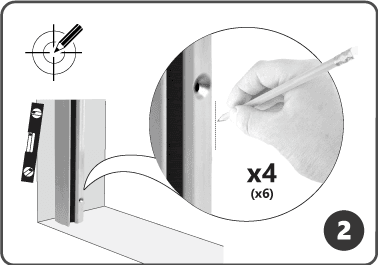
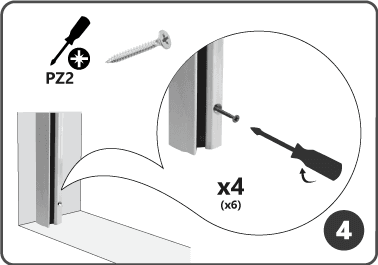
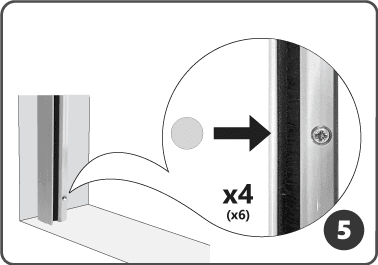
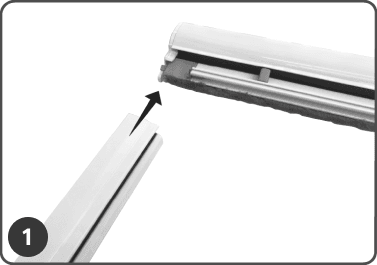
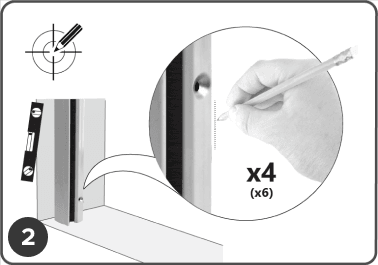
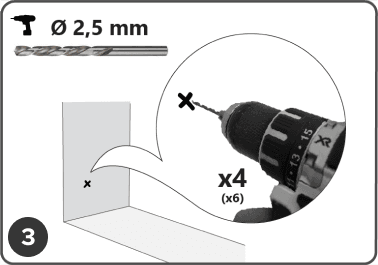
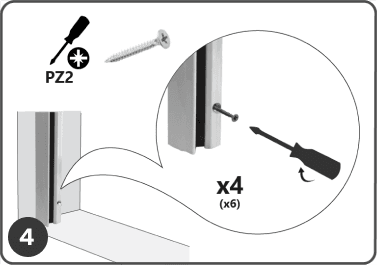
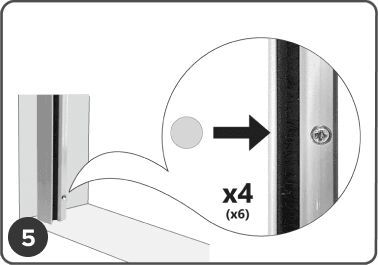
roller screen cassette, side guides, mounting screws, decorative caps

  • Width (mm)
    MIN 400 mm; MAX 1700 mm

    MIN 400 mm; MAX 1700 mmMin: 400Max: 1700

  • Height (mm)
    MIN 300 mm; MAX 1700 mm

    Min: 300Max: 1700

Inwards
Outwards
Front Screws
Side Screws
Adhesive tape
Standard
Transpatec
White (RAL 9016)
Anodized
Anthracite (RAL 7016)
Light brown (RAL 8001)
Brown (RAL 8014)
Prices for items sold by SIA "Ripo International Ltd" include VAT. Depending on your delivery address, VAT may vary at Checkout.
We accept payments:

Production in 7 working days

Installation in 10 minutes

Delivery in 5 working days

24h order cancellation option

 
Made a measurement error? After your order has been placed, you have the option to correct or cancel your order within 24 hours and we will refund your money.
Measure

A. Window opening dimensions:

1. Measure the width of the window opening (W). Make sure the side of the window frame is at least 32mm wide.
2. Measure the height of the window opening (H). Make sure that the upper edge of the window frame is at least 40 mm high.
3. Enter the dimensions W and H in the product calculator.
The manufactured product dimensions will be + 64mm (+32mm on each side) in width and + 40mm in height.

B. Total dimensions:

1. Measure the width (W) of the window opening at the top (W1) and bottom (W2). Check that both dimensions are equal, W1=W2. If the measurements differ, the smallest should be used. In this case, the deviation must be compensated with a sealing element when the net is installed.
2. Measure the window height (H).
3. Enter the dimensions W (W1=W2) and H in the product calculator.
The dimensions of the finished product will be the same as the dimensions you have measured.

Want to be 100% sure about measurements?
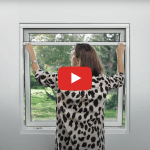
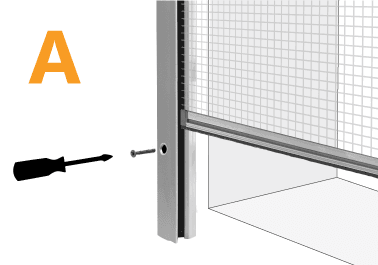
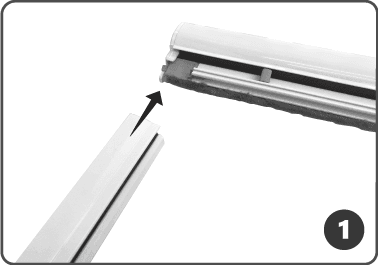
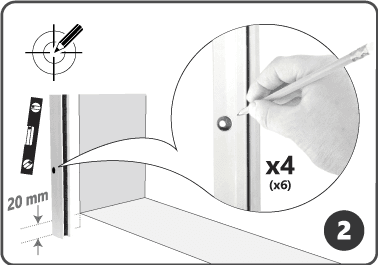
Take some pictures of your windows or doors and send them to us using chat or the contact form. Our consultant will help you and recommend how to take measurements correctly.

Install

A. Roller insect net is installed along the edge of the window frame.

Roller insect net is installed along the edge of the window frame.

AB1 - Rullo sieta uzstādīšana

Attach the side guides to the screen cassette.

A2 - Rullo sieta uzstādīšana

Place the screen on the installation place. Mark the places to drill holes for the screws (if necessary). Check with a spirit level that the side guides of the screen are at the correct level (recommended).

A3 - Rullo sieta uzstādīšana

Drill holes in the marked screw locations with a 2.5 mm drill bit (if necessary).

A4 Rullo sieta uzstādīšana

Screw the side guides of the insect net to the window frame with the included PZ2 screws.

Cover the screw areas with decorative pins.

B Rullo sieta uzstādīšana

Roller insect net is installed to the inside of the window opening.

AB1 - Rullo sieta uzstādīšana

Attach the side guides to the screen cassette.

B2 Rullo sieta uzstādīšana

Place the screen on the installation place. Mark the places to drill holes for the screws (if necessary). Check with a spirit level that the side guides of the screen are at the correct level (recommended).

B3 Rullo sieta uzstādīšana

Drill holes in the marked screw locations with a 2.5 mm drill bit (if necessary).

B4 Rullo sieta uzstādīšana

Screw the side guides of the insect net to the window frame with the included PZ2 screws.

B5 Rullo sieta uzstādīšana

Cover the screw areas with decorative pins and stickers.

B. Insect net attached in the window box

Attach the side guides to the screen cassette.

Place the screen in the window that shows you where to install it. Mark the places for drilling holes for the screws. Check with spirit level that the screen controls are at the correct level.

Drill holes in the marked screw locations with a 2.5mm drill.

Screw the side guides of the insect net onto
the window openings with the included PZ2 3.5mm screws.

Put decorative stickers on the screws.

Mesh types

Standarta - pamata aizsardzība pret kukaiņiem

Standard - basic insect protection

Economy PVC mesh provides highly effective protection against insects thanks to a mesh size of 1.48 x 1.58 mm with 60% transparency and good air circulation at the same time. This fabric has been tried and tested a million times over for years and is widely used in all insect screen types. 
– Tear-resistant and weather-resistant fabric made from plastic-coated fiberglass.
– Practically no fraying due to thermofixed infrared welding of the crossing points.
– A good view thanks to the neutral grey coloring.

Transpatec - gandrīz neredzams siets

Transpatec - almost invisible screen

Provides brilliant 80% transparency and an almost unhindered passage of light – it is almost invisible from both sides. The individual mesh openings are smaller than in a conventional fiberglass fabric and the protection against insects is therefore even better – the size of the mesh hole is only 1.26 x 1.34 mm.
– Robust, weather-resistant, tear-resistant and PVC-free.
– Thanks to the innovative anti-dirt coating, fewer flying dust and fiber particles stick to the fabric.

Maintenance

Best places to install roller insect screen

The best places to install a roller insect screen are in the kitchen, living room, bedroom or in rooms where the windows are used frequently. Keep in mind that the window on which you are going to install the net is not in a place where people will not notice it and accidentally damage it, because insect nets cannot withstand scratches, high pressure, shocks, etc. Rough treatment, e.g. by children and animals, can quickly make the insect screens ugly or damage them.

Cleaning

Over time, insect screens collect dust and dirt. The best thing you can do is regularly vacuum the insect screen. To clean the insect screen from other dirt, it is best to use a garden hose or similar. Remove the insect screen if possible. Place the insect screen in the bathtub or shower. If you have space outside, place it on the lawn or a hard surface, taking care not to expose it to dirt. If you rinse the insect screen regularly to prevent dirt from getting stuck in the net, you won’t have to remove stuck dirt later. If dirt is still stuck, use a sponge or a soft brush to scrub the insect screen. Use soapy water if necessary. Do not use solvents or abrasive cleaners.

Removal

Once you have installed an insect screen, it does not need to be removed except you want to replace or clean it. Roller insect screen installed on the outside of the window frame does not need to be removed in winter, as it can be rolled up and stored in the cassette.

Customer Reviews

Based on 7 reviews
57%
(4)
43%
(3)
0%
(0)
0%
(0)
0%
(0)
T
Talia
Rullo insect net

Great Rullo insect net. Recommend!

M
Markus W.
Bra produkt!

Mycket nöjd med insektsnätet som fungerar som aviserat. Måtten var perfekta etc. Drar dock ned en stjärna då jag tyckte installationen var rätt komplicerad (utsida av fönster) exempelvis var väldigt lätt att skruvar ramlade in i skenorna när man skulle hitta in i hålen och då var de svåra att få ut. Jag löste det till slut genom att tejpa fast skruvarna i hålen innan jag monterade. Detta kunde nog ha lösts bättre designmässigt.

Jag rekommenderar köp!

H
Heike P.
Bra

Nätet är mycket bra. Men det var svårt att montera ramen, att får de små skruvarna genom ramens u-profil och skruvar fast på fönsterkarmen.

k
kjell s.

Mycket bra väl värda priset

G
Göran F.

Rullinsektsnät